Best Practices For Rivet Removal
Today, we will be removing a panel from the exterior of the camper. To do this, we will have to remove a lot of rivets: buck rivets. After a year of experience, we have a favorite method of tackling rows of rivets which we will share with you today!
Equipment
For this process, you will need a:
- Power Drill
- Rivet Removal Tool
- 7/64″ titanium coated drill bit (or thinner than shaft of rivet)
- 5/32″ titanium coated drill bit (or thicker than shaft of rivet)


Things to Know Ahead of Time
When we are removing rivets, we have two goals. The first is quite obvious: to remove the rivet from the aluminum sheet. The second is less obvious: to do as little damage to the aluminum sheet as possible. We destroy rivets in the de-riveting process but, more often than not, we will be reusing the aluminum sheet. That means that we don’t want to scratch the exterior and (arguably more important) we don’t want to enlarge the rivet holes beyond their current size. Larger holes require larger rivets to be properly resealed. Keeping each hole consistent will minimize complications. So, using the right sized bits can be critical!

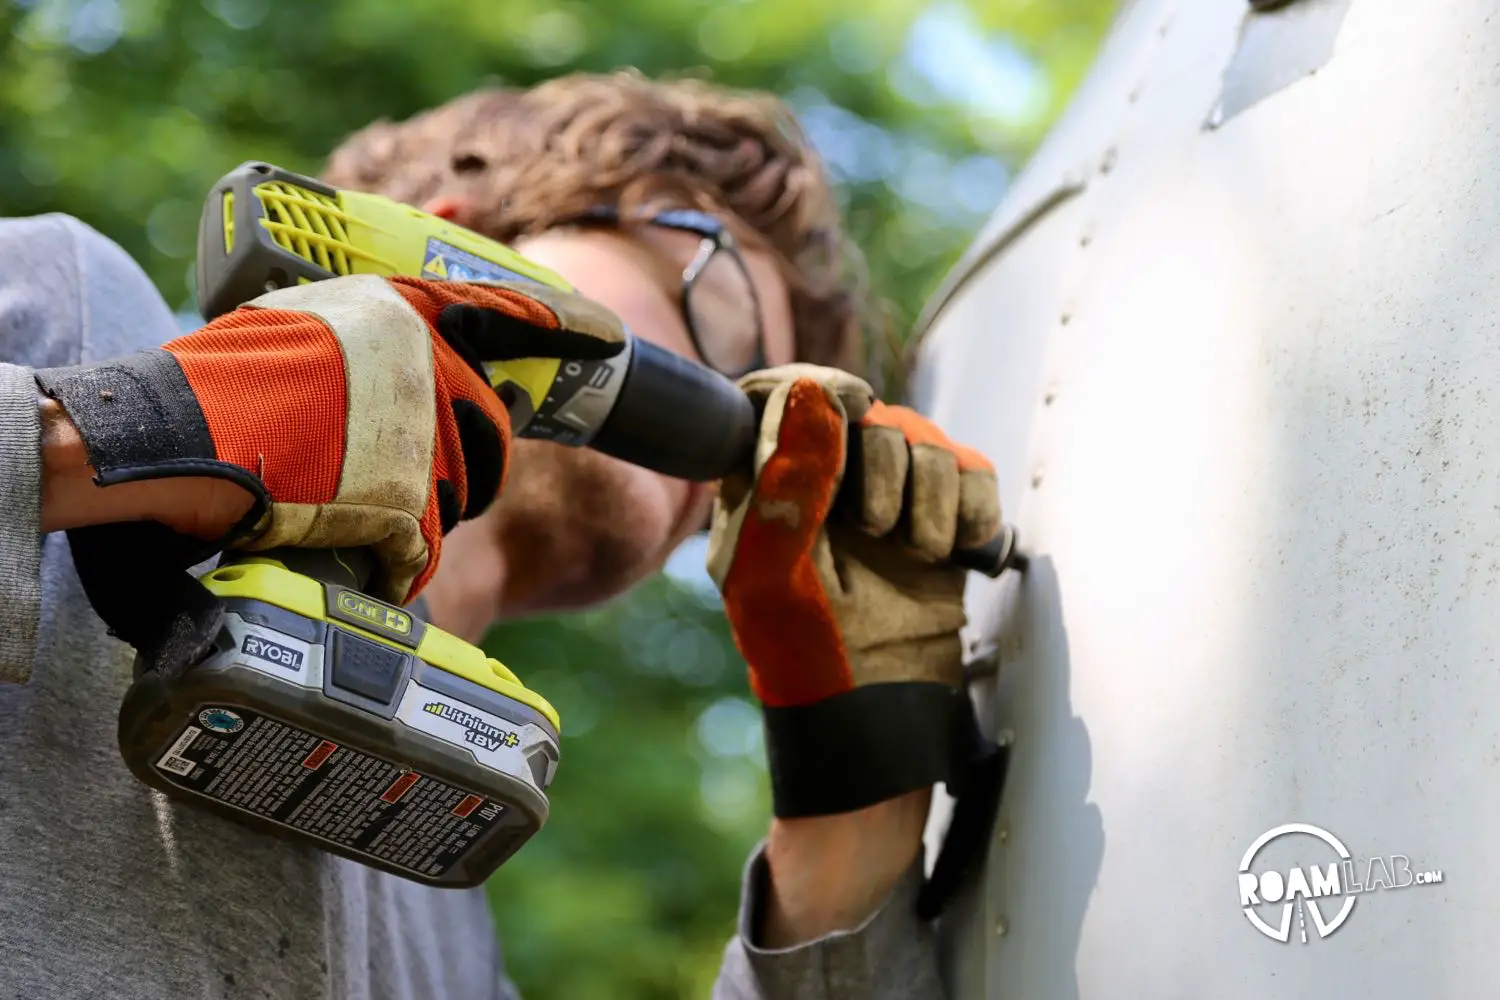
Removal
We approach rivet removal as a three step process. First, we use the rivet removal tool to form a dimple in the center of the rivet. See how the collar around the rivet removal tool wraps around the rivet head and centers the interior drill bit. The dimple doesn’t have to be very deep, just enough to guide the drill bits.
Once we have the dimple drilled, we switch to the first drill bit. We are using a 7/64″ drill bit because that is smaller than the 1/8″ shaft of the rivet. You can use other sizes, but the goal is to pick a bit narrower than the rivet shaft. Use the dimple as a guide to drill through the body of the rivet. You don’t have to drill all the way through the rivet, just through the mushroom shaped head, into the level of the sheet aluminum.
Technically, we could use the rivet removal tool to do this. But we prefer the small drill bit because it allows us to better see what we are doing.
Finally, we switch to the second drill bit. We are using a 5/32″ titanium coated drill bit. This drill bit is wider than the shaft of the rivet. Drill into the same hole but, this time, you should not need to drill very much at all for the rivet head to pop free.
Do not drill into the aluminum sheet itself. If the rivet head is resistant and won’t pop off, try stepping back down to the smaller drill bit and make sure you have drilled deeply enough and then return to the larger drill bit. If that still does not free the rivet head, step to an even larger drill bit and see if it can free the rivet still without damaging the aluminum sheet.


Conclusion
While this three step process may seem overly complicated to just remove some rivets, we have found it to be the most efficient way to remove a lot of rivets with the least amount of damage to the aluminum shell
If you have any further questions or your own experience in rivet removal to contribute, please share it in the comments!
Also, if you found this video useful, please give it a “thumbs up” on Youtube so we know we are doing a good job!


Ugo Baravalle
Hello, good morning.
I am an italian vintage Rv collector. At the moment restoring an Airstream motorhome 350. Half on the way, but is big…
Looking on the next project i cam on your site and very surprised wath nice job you have done.
Before to start to buy one, bring to Italy, find a lot of bad surprises i have one question: do you want to sell your?
May be not now, but in the life we have a lot of changes, at list me.
Let me know and congratulate for the nice job.
Ugo
Lexi GoForth
Thanks Ugo,
That’s very flattering! I can completely understand not wanting to take too many risks when importing a vintage camper. With all the time and effort we’ve already put in, I don’t think we’ll ever do this again. That said, we have no plans to sell our camper. But we are always happy to answer any questions you may have about Avion campers.
Michael
Hi Lexi
I used your rivet r removal technique and it works great.
Many thanks
Btw I have a few patches to address. What thickness aluminum sheets are you using ?
Is there a specific diameter and length you find works best
Lexi Goforth
Hi Michael,
I’m glad that’s working for you. We are using two different thicknesses of aluminum. One for outer walls and one for inner walls. The inner walls are 0.032″ and the outer walls are 0.040″.
Mike
Thanks
There are many rivet sizes and lengths available. What have you found the best for both interior and exterior.
Thanks again
Masks, gloves and social distancing lead to happy roaming ;>D
Lexi Goforth
Hi Mike! That’s an excellent question. I work with two rivet diameters. The standard rivets we use are 1/8″ brazier head buck rivets. This is a fairly standard rivet and used on Airstreams as well. When I am riveting old holes where we removed the original rivets and are now replacing them, I size up to 5/32″ diameter rivets. This would generally look odd, since the heads are usually larger than the 1/8″ rivets. Fortunately, Vintage Trailer Supply produces a 5/32″ rivet with a head that matches the 1/8″. So I use those.
The question of length really depends on how thick a piece of aluminum and how many sheets you are riveting through. I have 1/4″, 3/8″, and 1/2″ long rivets that I work with. For most cases, the 1/4″ is perfect. If I’m riveting aluminum sheet to extruded aluminum, I may need to size up to 3/8″. And there are rare occasions, such as when I’m riveting the thick curved flair that wraps around the “ultra” on the side of our Avion that I need the 1/2″ long rivets.
I am considering pop rivets for the interior walls. That’s what was holding our original walls in place. But I want to do a bit of experimenting with olympic rivets first.
I hope that helps!
Lexi
Mike
Thanks Lexi,
I need to replace all the wood i started with the wings I haven’t reinstalled the jack Brackets yet. I noticed the side wall wood is below the floor. Is there any preference for replacing one first, side walls, floor or bed. Someone epoxyed a replacement floor at the entry and unfortunately glued the fiberglass shell do I have some investigation to do, to get that off first. I get the impression things are not going to be to sturdy when all the wood is taken out and the aluminum sheets are not supported.
;>/
Thanks again
Lexi GoForth
Hi Mike!
I’m sure there are people who have tackled this in many different ways. In our case, though, we started with the wings, like you did, and worked our way down to the side walls and then the floor – replacing one and then moving on to the other. By doing the wings first, we could then offset the camper weight using the jack points as we tackled the side walls and floor. I was building each piece as Chris removed the original. That way we could minimize the amount of time the camper had to stand without support. You can see a couple shots of the camper without the side walls and then without the floor in our post about replacing the camper floor: https://roamlab.com/replacing-rotten-truck-camper-floor/
That’s a bummer about the fiberglass shell. It can be enough of a headache on its own. At least it was going to have to come off with the floor anyway. So you should have an opportunity to shave the floor off the shell. Odds are, you are going to need to reinforce it a bit, anyhow. Ours had a lot of holes in it which left the shell very brittle.
All the best,
Lexi
Mike
Hi Lexi
Thanks for your comments.
I finally removed all the insulation and was thinking about some type rubber for seam sealant prior to spraying closed cell insulation. Did you use any? I read a big concern was trapping water however if its completely dry I figured it would seal in both directions. What’s your thoughts.
Lexi
Hi Mike,
We didn’t opt for a rubber sealant. That said, in hindsight, I wish we had started with a ceramic spray to improve the insulation. We are looking to use some ceramic spray on the few spots that haven’t been insulated yet.