Powder Coating RV Emblems
There isn’t much color on the exterior of our Avion truck camper. Being anodized aluminum, our home on wheels is mostly whitish silver. But, like most RVs, we do have emblems on the front and back featuring the manufacturer’s branding: a bold, uppercased AVION in red and silver. In addition, we have emblems on the sides of our truck camper promoting its premium status as an Avion Ultra. The high-end upgrades of the 1970 ultra models may have been stripped in our remodel, but the emblems remain. Unfortunately, they are all in terrible shape. And that’s after four attempts to paint our emblems. Every time we carefully sand, prime, and spray our Avion emblems, the paint eventually flakes off. But not this time. This time, we bought a powder coating kit.


What is Powder Coating?
Powder coat is a resilient finish or base generally used to color and protect metal components from corrosion and other environmental weathering. We often find it on metal household appliances, automotive hardware, and tools. But what it is can often be glossed over.
The name “Powder coat” is very descriptive. While the final colorful covering may appear to be a smooth enamel paint, the color is initially applied as a powder similar to a baking powder consistency. This powder comprises pigments, binding agents, and other additives that are applied using a specialized powder coating gun. The gun introduces an electrostatic charge to the powder, which is attracted to the grounded part that is being coated. At this point, the powder coat can be easily brushed off the part in case of a mistake. What turns the powder into a durable covering is the curing process. Heat melts the powder, resulting in incredibly resilient bonds.
Powder coat is much more flexible than common paint and less likely to chip. But the electrostatic and curing steps of the powder coating process limits its applications mainly to conductive and heat tolerant applications. That mainly means solid metal surfaces. Powder coating also has a steeper learning curve than most paints. Each step comes with extra complications and considerations, which we’ll dig into. But the result is impressive.

Powder Coating Equipment
While we have painted these emblems multiple times, this is our first time powder-coating. So most of the equipment and materials we had to source for this project. It’s a lot of equipment, but we hope to be making use of it even more in the future.
Preparing The Emblems
- Paint thinner
- Tub large enough to hold the emblems
- Isopropyl alcohol
- Clean cloth
- Tack cloth
- JB Weld extreme heat
- Toothpicks (to apply JB Weld)
Applying Powder Coat
Curing Powder Coat
- Toaster oven
- Hooks to suspend the emblem (we bent our own wire)
- Pliers
- Cooling rack
Safety Equipment
- Nitrile gloves
- Safety glasses
- Welding gloves
- Mask
A Note About Eastwood
I don’t usually talk too much about vendors. But after so many failed attempts to paint our emblems, I wanted to do this right. Which meant I spent a lot of time chatting with Eastwood’s customer support. Not only were they friendly and informative, but they were happy to go into detail about why I should or should not approach this project in different ways. One thing is for sure, the next time I have a powder coating project, I’ll be buying from them.
Preparing The Emblems
Powder coating may be more durable than paint, but it still needs proper preparations for adhesion. We wear gloves while cleaning and handling the emblems to avoid any oils attaching to the emblems that might limit the power coat’s adhesion.
Removing Paint
While quite a bit of the original paint has chipped off, what remains is still a challenge to remove. In our last round painting the emblems, we blasted the emblems with ground walnut shells to remove the prior coat of paint. The end result was such a mess that we opted for a more contained approach.


This time around, after soaking in paint thinner and scrubbing with wire brushes, we have removed the old paint and even some old oxidation from the emblems. We wipe off any remaining residue with a tack cloth. To our surprise, the stripped emblems are rather shiny underneath it all.

Degreasing
With most of the grime cleaned off, there’s one last step to prepare the emblems: degreasing. We handle the metal a lot while assessing each part, but the oil from our hands can prevent the powder coat from properly adhering. So, we need to degrease the emblems. I’ve seen other demonstrations using acetone, but we now use mineral spirits or isopropyl alcohol after a minor misadventure. (Acetone can trap moisture in the emblem and cause pitting from degassing during the curing process.)
Patching Cracks
It’s rather surprising, but even under all those layers of paint these emblems have their share of corrosion. Before powder coating the emblems, we want to patch some of the more noticeable holes and unevenness. Of course, we can’t use just any patching material. We need something that can withstand the 450°F curing process of the powder coat and hold the charge used in the powder coating process. For this, we settle on J-B Weld Extreme Heat. This viscus metallic compound is designed to fill cracks, gaps, and holes for steel, iron, and other metallic environments up to 2400°F. Better yet, unlike standard J-B Weld, it is full of steel shavings. While standard J-B Weld is not conductive (something necessary for standard powder coating) this is.

Powder Coating the Emblems
With the emblems cleaned and prepped, we have left to apply the powder coat and cure them. But the process is a little more complicated than one might anticipate. This is a multi-part application because we have two colors to apply—silver and red—along with a protective clear coat. Leaving out one of the two colors would look wrong, but including the red and silver detailing will involve the additional challenges around masking and applying multiple coats. Each layer will require us to go through the full application and curring process before moving on to the next color. And each layer will further insulate the electrostatically charged powder from the grounded emblem. So we have to be strategic. After learning from the manufacturer that the red pigment will likely bleed through silver, we will start with a chrome base coat. Then we will mask off the chrome portions and apply the red coat. Finally, we will cover everything with a clear coat.
Preheating
Even before we start applying the powder, our emblems present their own special challenge. Preheating is not common in powder coating. Most pieces are powder coated at room temperature. But our cast metal emblems add an extra challenge compared to extruded metal parts. The process of casting often traps gasses in the molded pieces of metal. So, cast metal items often off-gas when heated up. This can cause bubbling and pitting during the curing process as the escaping gas disturbs the melted powder coat layer. Therefore, before we start applying the powder coat, we preheat the emblems to the curing temperature. Granted, this means that the clock starts ticking right away as the emblems begin to cool. But once we get the powder coating process streamlined, this seems to make a difference in our emblems’ final quality.

Applying Powder with a Powder Coating Gun
As noted earlier, the powder coat uses a powder coating gun to electrostatically charge the pigment so that it is attracted to the grounded part. We make sure to have a clean piece of the emblem to attach an alligator clip, which grounds the emblem. The gun is hooked up to a power source (to charge the powder) and an air compressor (to blow the powder onto the emblem). The process requires a soft touch. Too much pressure from the gun can blow the powder off the emblem rather than add more. But once we have a nice, even coat, we are ready to carefully transfer the emblem to the preheated oven.

Curing Powder Coat
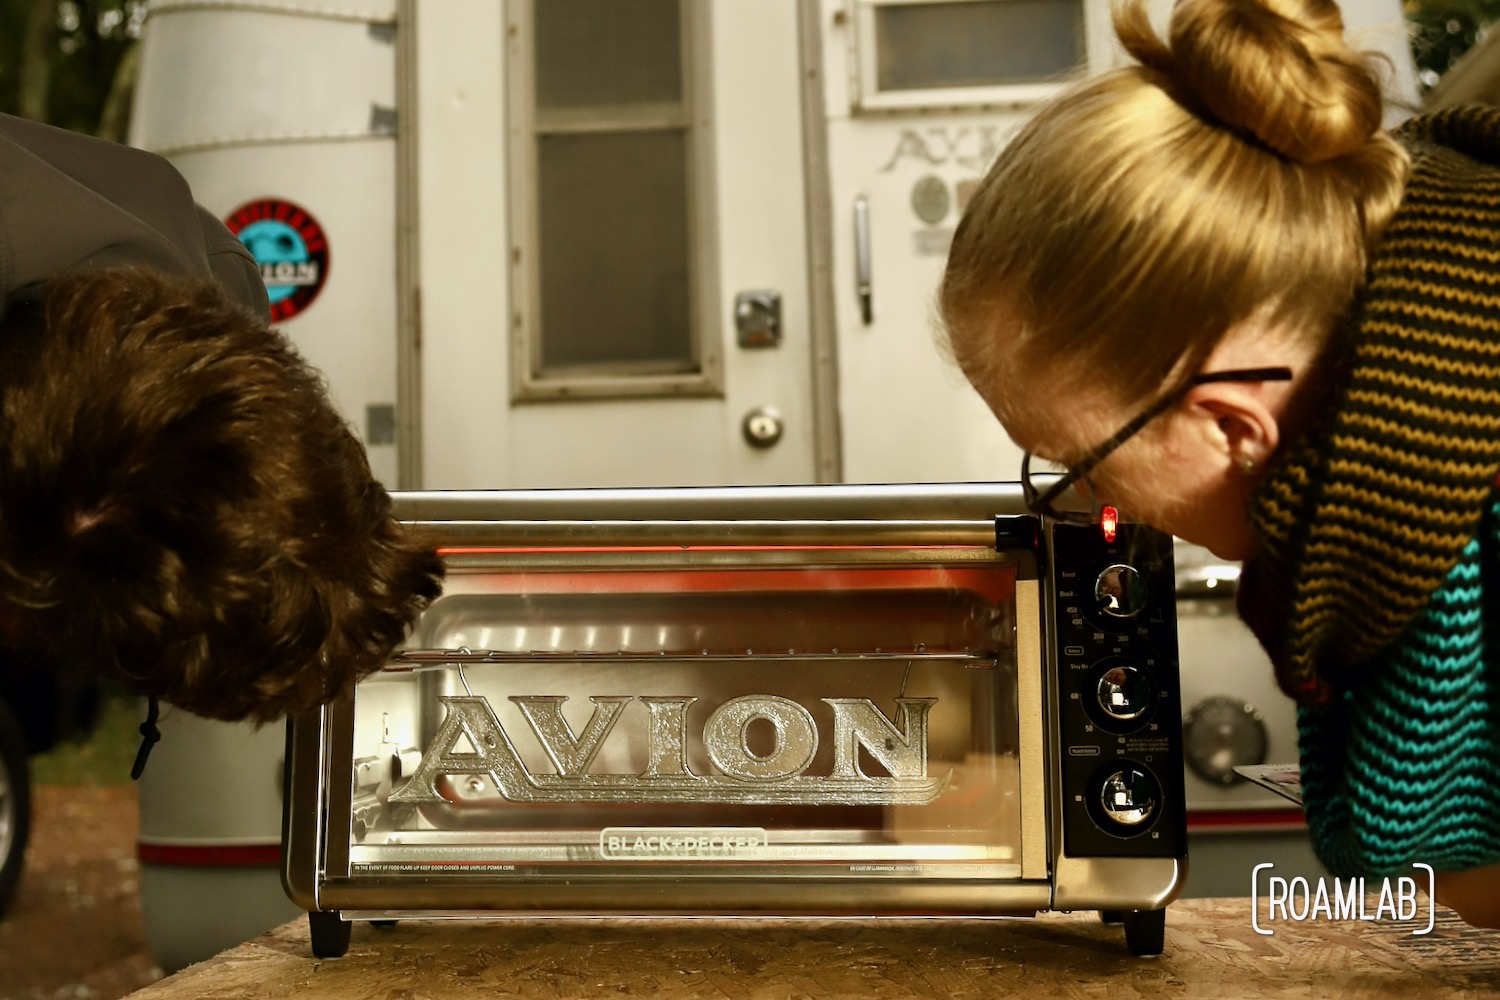
We are using an 8-slice toaster oven to cure the emblems. The key is to fit the part being powder coated into the oven and let it cure at 400°F for 10-minutes. (Time and temperature vary by the powder coat used). The off-gassing from the powder coating is not only nauseating but will adhere to the oven. Therefore, this off-gassing will continue to permeate anything cooked in the oven in the future—be that another powder coated item or cookies. So we need a dedicated outdoor oven for powder coating.
Once the oven is preheated to 400°F, we carefully hang the emblem in the oven. This is a little awkward since the fit is so tight. One handy aspect of powder coating is how easy it is to start over by brushing off the unwanted powder coat. If the application is bad, you can easily brush the powder off and start again. But that also means we have to be careful not to bump the emblem, or else the powder could brush off unintentionally.
With the emblem is safely in the oven, we watch for the point that the powder coat begins to melt and become shiny. Now, we set the timer for 10-minutes. Once the cure is complete, we carefully set the emblem aside to cool. Fortunately, we have welding gloves, which makes working with the hot emblems a lot easier!

Environmental Variables
With so many emblems to paint and layers to apply, we experience a wide range of fall weather from warm to cold and wet to dry. Most significantly, we run into problems one rainy day. While our workspace is covered, the humidity is 98%. Moisture in the air disrupts the particles’ conduction as they pass through the gun’s ionized airfield. So, while we hook our emblem up and charge the particles passing through the gun, as usual, the results are disappointing. In the future, we certainly will want to tackle similar projects on warm days with low humidity.
Applying a Dual Coat
After our first round of powder coating, each emblem has a sturdy and consistent chrome powder coat. Unfortunately, we have a relatively complicated design to reproduce. As we addressed earlier, our emblems are bi-colored. To apply the red coat without covering the edging—which is supposed to chrome—we will need to mask the edges from the red paint. When spray painting, I would use painter’s masking tape to protect my silver coat from the red coat. But common masking tape will burn in the curing process. Instead, we need to use specialized heat-tolerant masking tape. We have two choices: fiberglass or polyester.


Masking: Fiberglass vs. Polyester Tape
Fiberglass and polyester are both handy materials for masking powder coat projects. Each tape is thick and capable of can handling the curing temperatures for powder coat. On the other hand, each is a bit clumsy to work with and has a bad habit of peeling away slightly in the heat. (A trait that usually doesn’t matter but was a bit of a headache for us) As is to be expected, each tape comes with its own strengths and weaknesses. Fiberglass tape is more flexible and easy to apply. But polyester tape will result in cleaner lines. We bought samples of both to test out.
My initial assumption is that we should use the polyester tape. As someone who loves clean lines, I am willing to undertake a few minor inconveniences to get the perfect masking applied. However, after our first attempt using the polyester, I quickly find the core challenge of polyester tape is sharp, short angles. While the tape is robust, it resists sharp angles and can peel away while we are in the middle of applying powder. This wouldn’t be a problem for large projects where there is a significant amount of surface area to adhere to after the corner, but we are working with 90-degree lips that are less than a 1/8-inch to tape. The tape gradually delaminates throughout the application and curing process.
While the fiberglass’s cloth makeup means the edges are a little fuzzy and too much handling can lead the fiber to unravel, it also means that the fiberglass tape can better wrap around the sharp edges of the emblems. While the edges are less precise, it’s far more reliable. Frankly, the difference is not that noticeable.
One Final Side Note
Because applying the fiberglass tape is a meticulous process and the tape frequently will adhere to my gloves while trying to apply it to the emblems, I resort to masking the emblems with my bare hands and then degreasing them with isopropyl alcohol. This does not work. The alcohol not only cleans the metal but breaks down the adhesive on the tape. So, even though the process is tedious, it’s important to wear gloves while applying the tape.


Hot Flocking
No discussion of powder coating would be complete without addressing hot flocking. Hot flocking is a means of applying a powder coat to an already heated item. Rather than relying on a charged field to attract and hold the powder, the heat of the object will cause the powder to start melting on contact and adhere. This is particularly handy to cut back on the cycles of heating and cooling when you have multiple layers to apply. It is also a potentially troublesome process. Because the paint melts as it hits the surface, it can trap air with it, leading to pitting during the curing process.
All that said, we have found an additional value in hotflocking: minimizing degassing. As we noted earlier, we preheat the emblems to release gas before applying the powder. This, essentially means that we are hotflocking the emblems.
By the time we reach our protective clear coat, however, hot flocking takes on a new function: applying a powder coat to a material that is essentially insulated. All those previous layers of powder coat limit the grounding, which would normally attract the charged powder. At room temperature, this would make adding another layer difficult. Fortunately, hot flocking will cause the final layer of clear powder coat to adhere with little effort.
Looking Back
Powder coating is complicated. I made tons of mistakes and had to start over several times. But after completing these emblems and riveting them back on the sides of our Avion, we can’t help but feel that deep sense of pride returning, knowing that we did this. Originally we intended to chrome the emblems. That would have required us to contract with a professional shop. We even talked with a few vendors nearby, but we set on tackling the project ourselves after a few short and impatient phone calls. The moment we discovered the high chrome powder coat sold at Eastwood was the deciding factor. We can safely powder coat these emblems ourselves and achieve nearly the same effect.
We’ll admit it: this isn’t a professional job. The emblems still bear the unevenness and pitting from decades of wear and tear that a professional may have been able to smooth over. The edging is fuzzy in places. And one time, we went a little overboard with hot flocking the clearcoat. That said, the powder coats are definitely more resilient than the painted layers that preceded them. After a few months in the elements and on the highway, we do not see the chipping and flaking that has become all too familiar.
So, here we are. One more project complete and a new skill learned. We can’t wait to see how we can use powder coating for future custom flourishes in our truck camper’s renovation. Do you have any questions about using powder coating in your renovation project? Let us know in the comments!