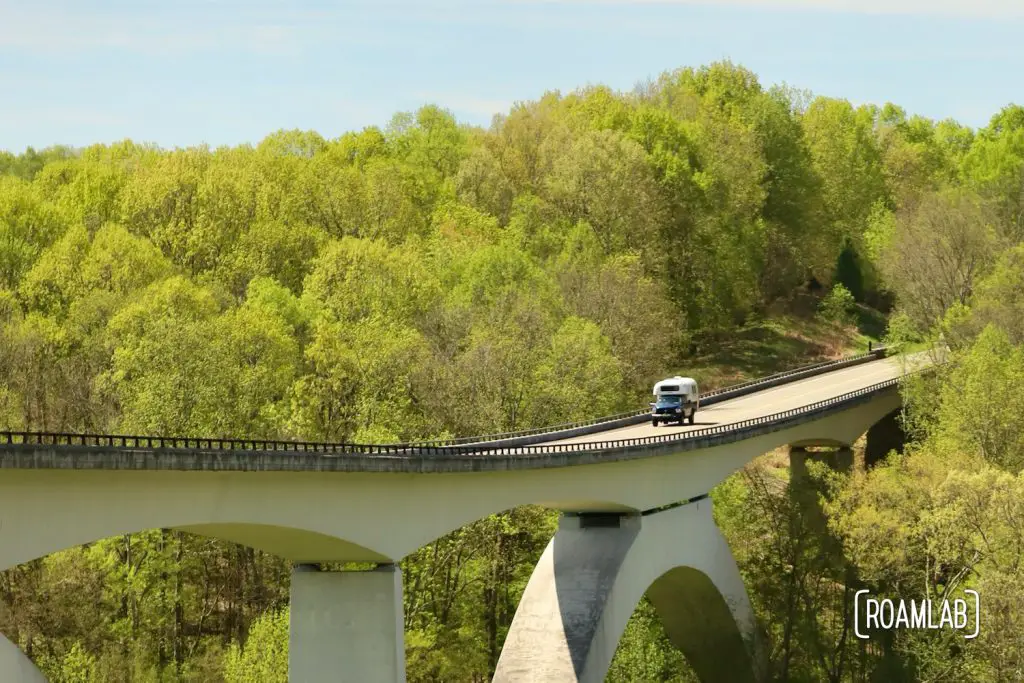
We are attaching solar panels to our truck camper with Velcro. Sounds crazy? Let me back up and explain.
Solar panels have become a common upgrade to RVs. They supplement the life of the RV batteries, enable extended camping away from hookups, and offer a renewable and safer alternative to propane and diesel power. That said, solar energy is a rapidly shifting game. Innovations in panel technology make systems more efficient and less expensive. These days, many solar panels may be replaced or augmented within a matter of years. Rather than gluing down a new panel every three years, we want to design a system to install and replace solar panels into our system easily. Sure, it means a lot more work and experimentation, but that’s our style at Roam Lab.
The Roof Layout
We need a large array of solar panels to support our 100% electrical home on wheels. Our 1970 Avion C11 truck camper may be small compared to most RVs, but requires a lot of power to run appliances that are commonly run on propane—such as the heater, stovetop, and refrigerator.
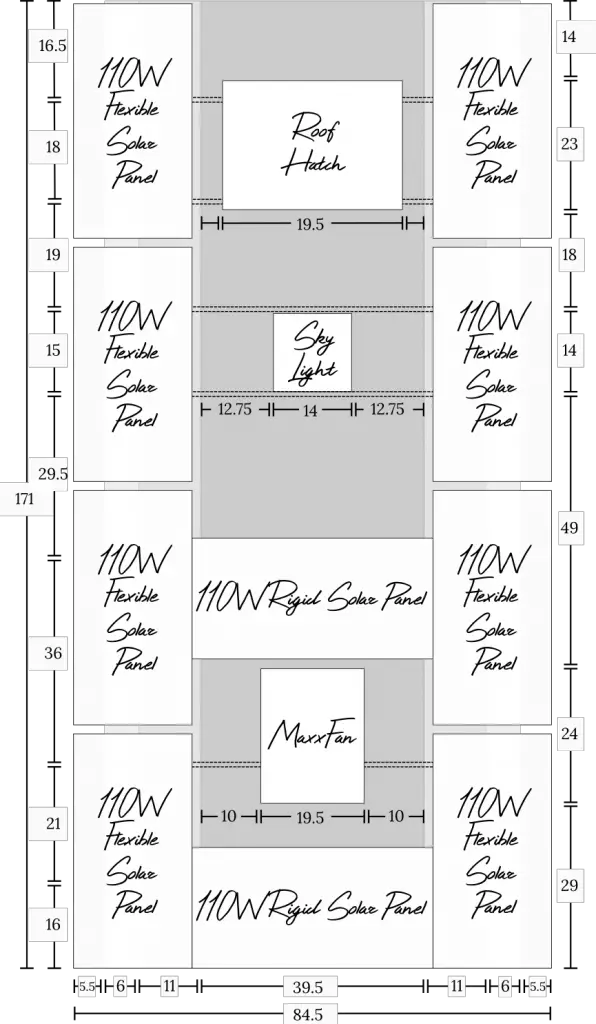
Truck campers are tough for solar energy. After all, their roofs are relatively small, leaving a limited real estate for panels. For Airstreams and campers like ours with curved roofs, the flat-mounted areas are even smaller. For example, while our camper is about 91 inches wide, the flat section down the center of the roof is about 42 inches. Subtracting out the space occupied by roof accessories such as our fan and roof hatch leaves very little space for mounting solar panels.
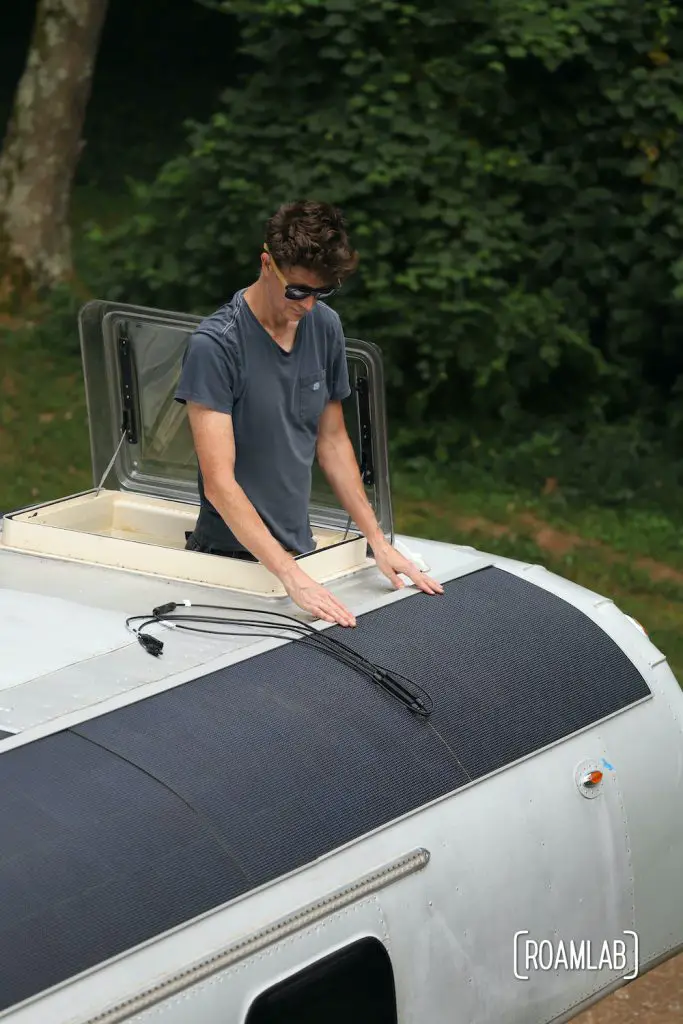
Fortunately, flexible solar panels allow us to take advantage of the curved space along the sides. So, for us, we are able to follow the upward-facing section of curves and claw back most of the width of the camper. The full width utilized by solar panels amounts to 85-inches, which is just short of the full 91-width of our camper. In addition, mounting on the curves along the side of the camper should allow us to better capture solar energy in the morning and evening when the sun is not directly overhead.
We addressed how many solar panels and where they will go in our post How Many Solar Panels Should I Buy For My Truck Camper? After many backs and forth, we manage to fit ten flexible panels—four along each side and two on top. This leaves us with the question of “how we will secure them in place”?
Flexible Solar Panel Challenges
Most flexible solar panels are attached with glue and a few screws. It’s fast and easy. But there are a few challenges that pop up as soon as we wander away from a quick and simple glue and screw solution.
Overheating and the Air Gap
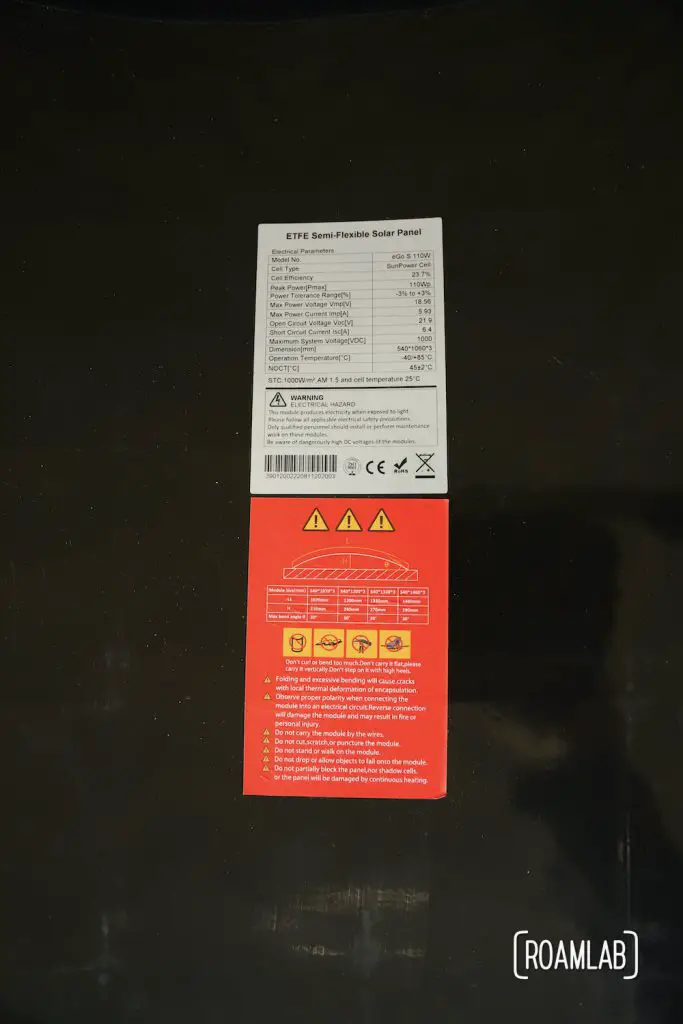
Flexible panels are ideal for curved surfaces such as our Avion but they are known to overheat due to poor air circulation. On a very hot sunny day over the summer, we set our panels on an aluminum surface similar to our camper and found that they quickly reach nearly 140°F.
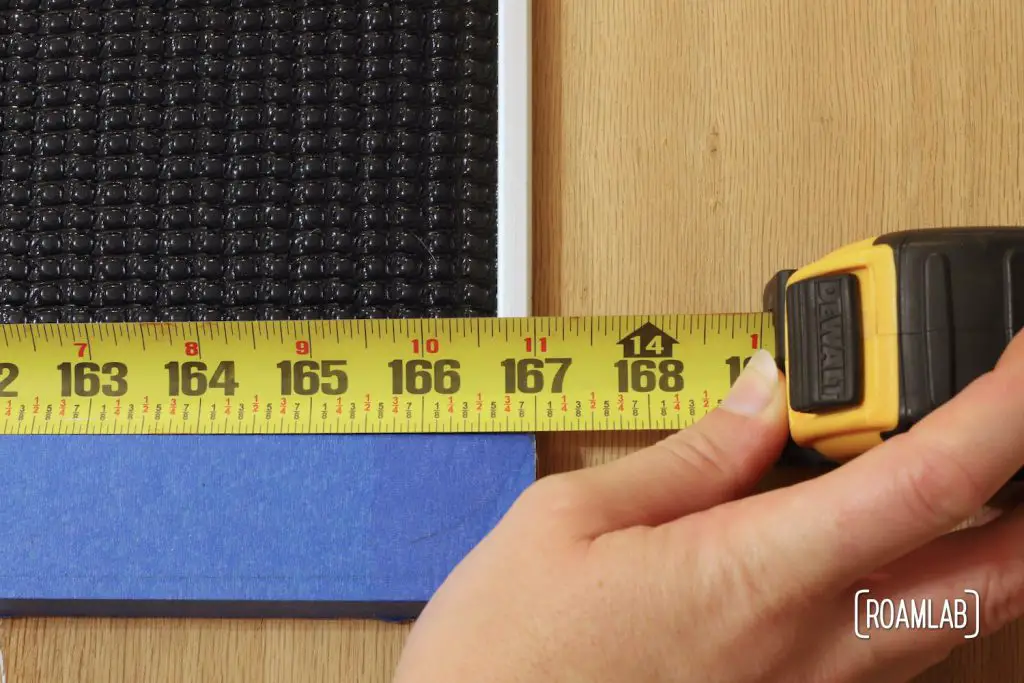
A common means of mitigating this problem is to add an air gap—a space between the solar panel and the roof to allow airflow and cool the panel. Our solution? Velcro! Sure, we put velcro on our shoes and bags to easily secure and release a temporary connection, but it can be so much more powerful. The Velcro we are talking about uses the molded nylon VELCRO® Brand High Technology Hook (HTH 757) “For heavy-duty applications with little to no cycling” designed for rough outdoor use. A little more on that later.
The Basics of Velcro
We have learned a lot about velcro in the process of this build. There are four main metrics to consider with velcro: cycle life, peel strength, shear strength, tension strength.

Cycle Life
Cycle life refers to the number of times the velcro can be separated and reattached before it begins to degrade. We will only be removing the panels for a few projects. So we are conscious of but not concerned by the low cycle life (100).
Peal Strength
Peal strength is the pressure needed to pull apart two pieces of velcro at a 90-degree angle. Funnily enough, this doesn’t apply to us because neither the camper roof nor the solar panels can be bent to a significant degree. The panels may be bendable, but nowhere near 90-degrees and that roof isn’t going anywhere.
Shear Strength
The shear strength is the pressure it takes to separate the velcro’s hook and eye by pulling the strips across each other. And this velcro is incredibly strong in that respect. The one time I slightly misplaced a panel, I had to completely remove it and try again rather than slide the panel into place.

Tension Strength
Tension strength is the most relevant metric. It describes the pressure needed to pull apart the hooks and eyes with a force perpendicular to the connection—in our case, pulling the panel directly away from the camper. This is how we remove the panels but it is a long and methodical process.
All together, we feel comfortable that the panels will be well supported by the velcro alone. But there is one more consideration that inspires some additional precautions.
Highway Conditions
An air gap can turn a solar panel into a wind sail. Cruising down a freeway at 65 mph could be disastrous with the potential lifting force of winds streaming over the camper’s body. So, while the velcro can easily hold the panels in place, we will also add a windbreak to prevent gusts from pulling the panels off the camper.
For this, we are installing an aluminum frame to protect the sides of each solar panel. It’s the final piece in our solar power mounting system. So, we are ready to start building.
Preparing for the Solar Panels
Aluminum Frame
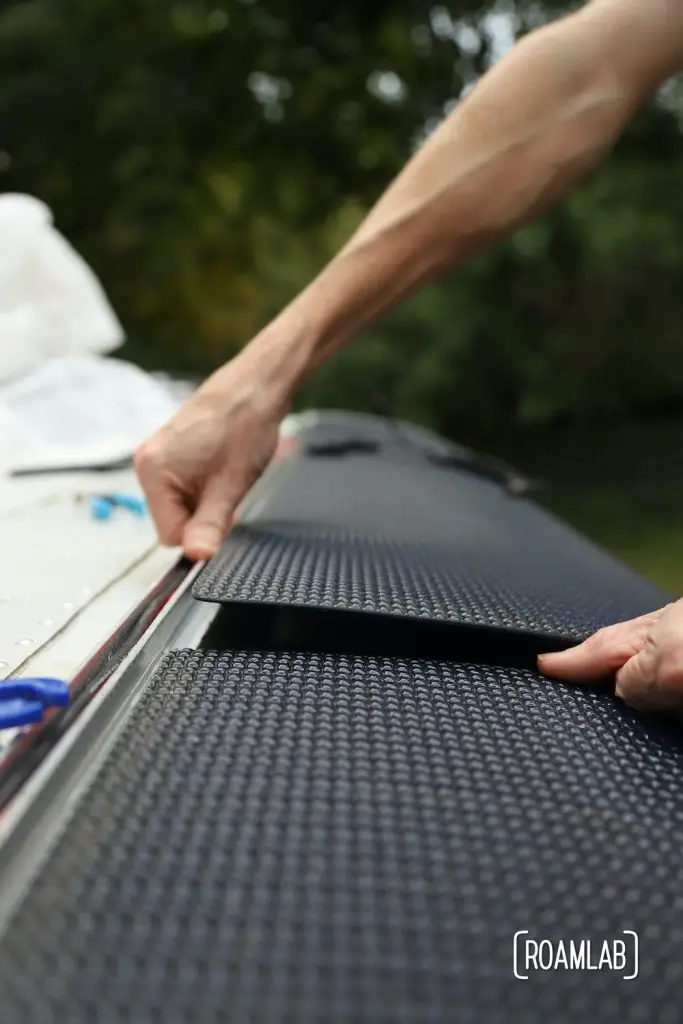
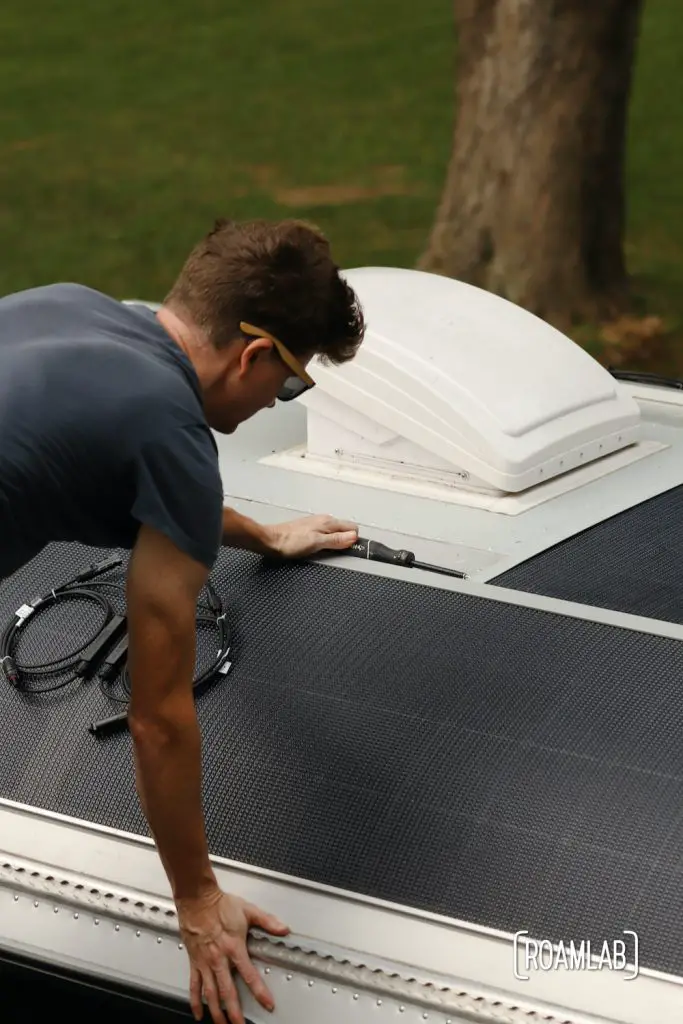
Each panel will be pinned in place with an aluminum frame. In keeping with our original intention, we want this frame to hold the panels snuggly in place and allow the panels to be easily removed and replaced. We settle on a combination of extruded aluminum pieces. Three sides will be secured with a J-bar, which will wrap around the edge of the panel, while the final side will be secured with two angle bars bolted together to make a removable U-channel so that the panel can slip in place.
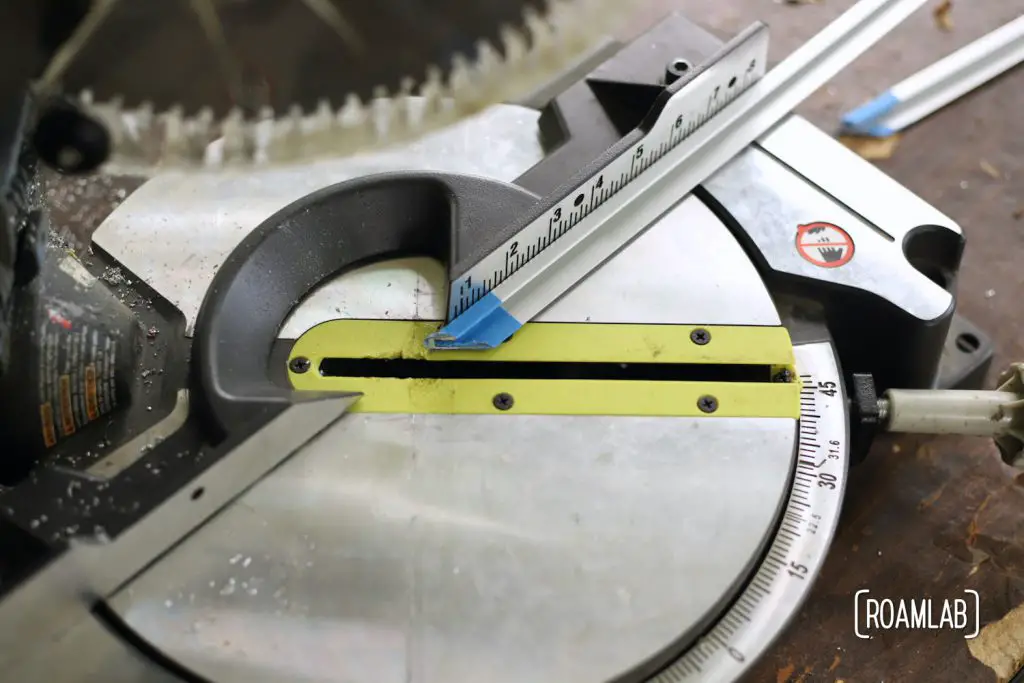
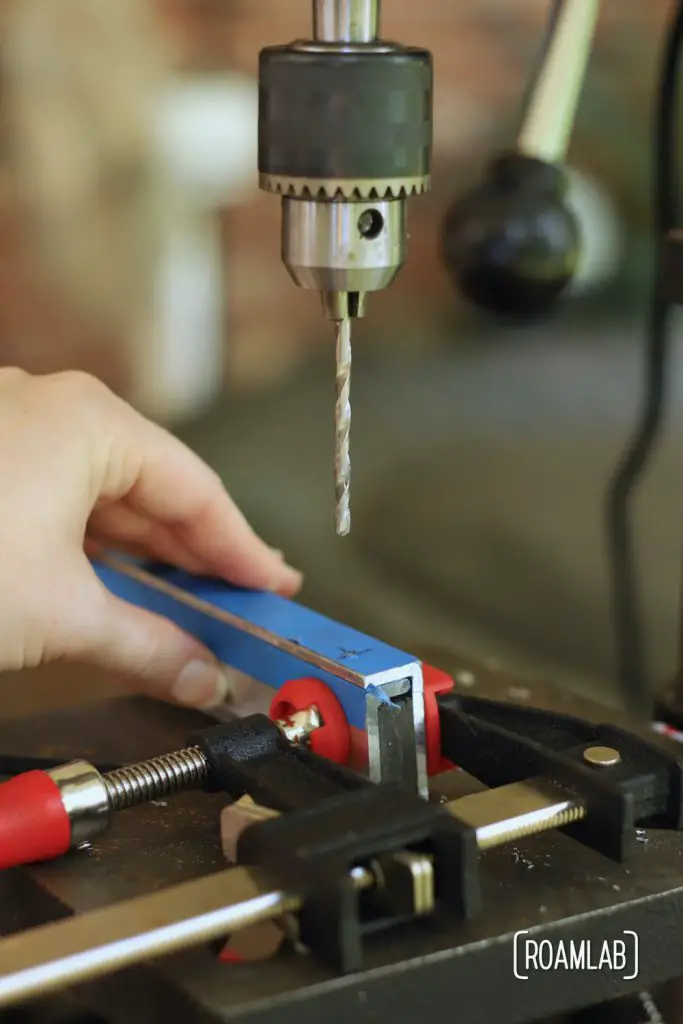
Tapping
Along with measuring and cutting the bars to size, we also have to tap the sections that will be removable. Using this tap, we can thread holes to receive a bolt. This way, we can make secure the removable sections of the railing with a stainless steel bolt.

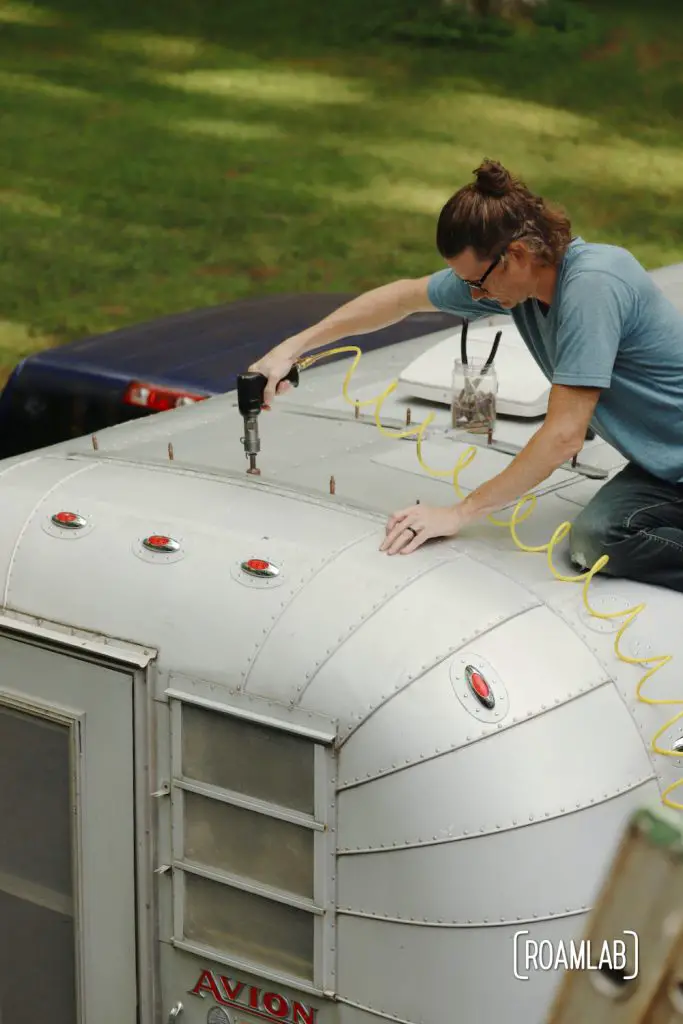
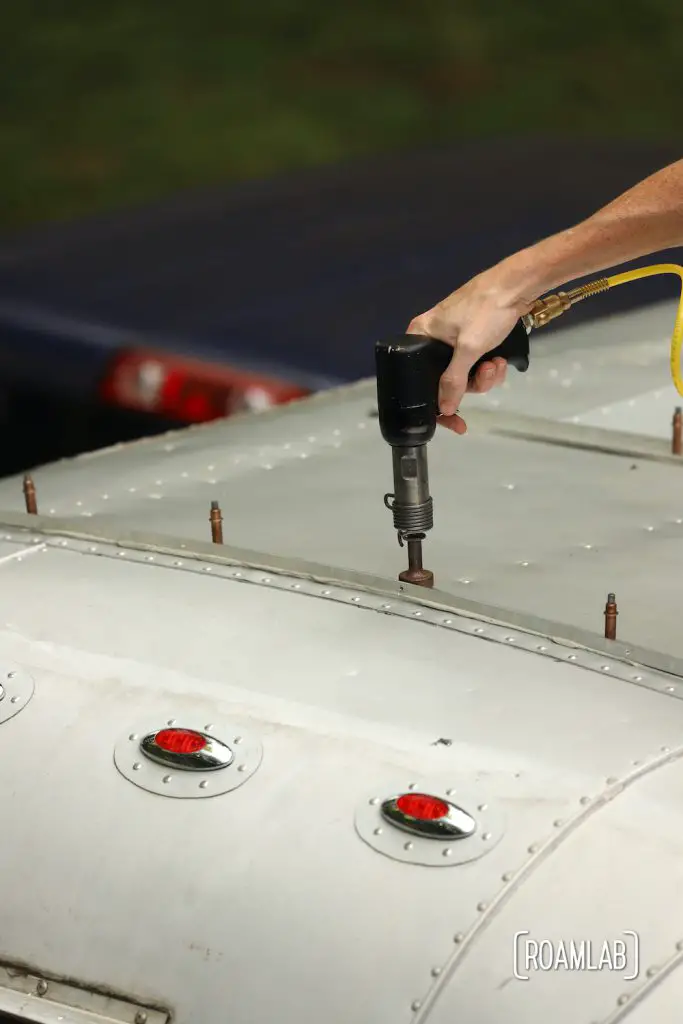
Buck Riveting
With everything in place, we return to our trusty buck riveting arrangement. Each rail is buck riveted to the roof. But to minimize the number of holes used (since holes can lead to leaks), we combine this with UHB tape. We secure the rails with the high bond tape and then add a little insurance with some rivets.
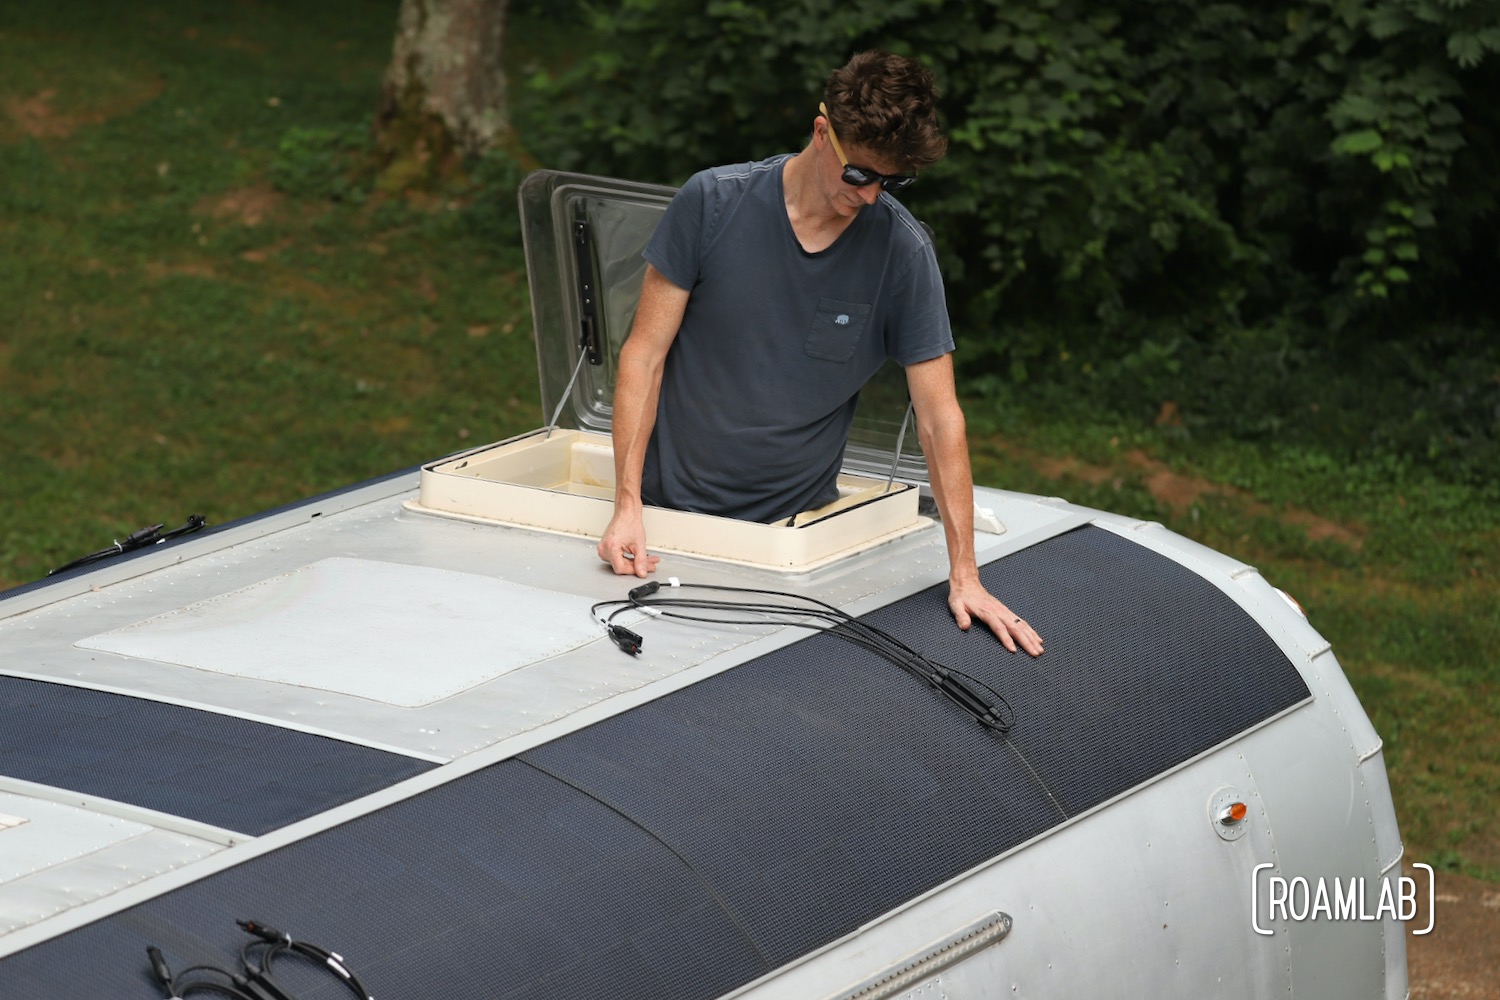
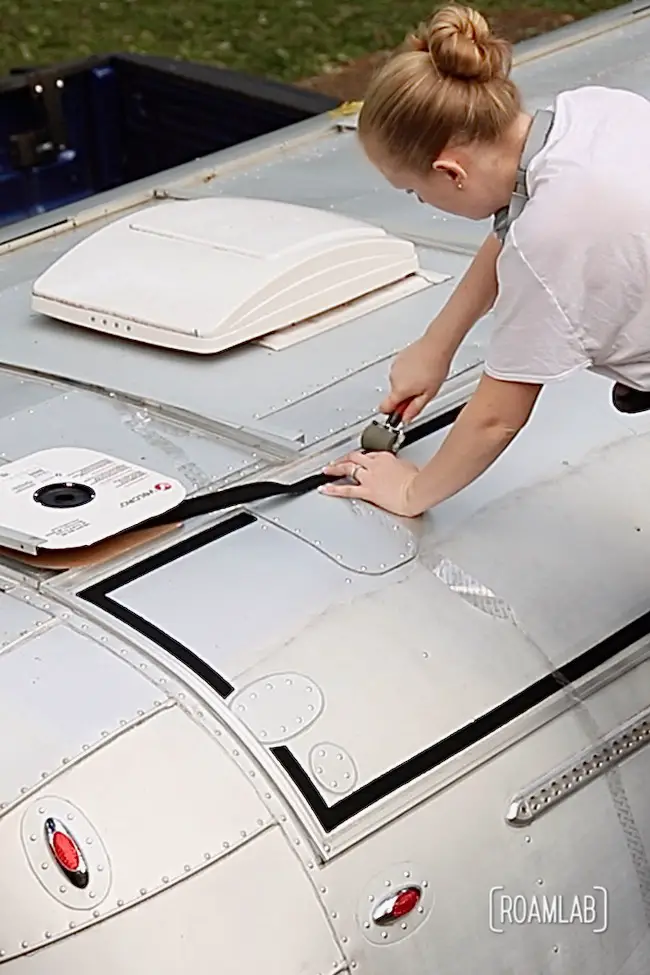
Velcro
And now, the main event! With the frames in place, we can start applying the velcro.
Velcro is only so strong as its connection to the items it connects. Fortunately, the adhesive on the back of the velcro strips we are using is ideal for binding to anodized aluminum. So a scrub down with isopropyl alcohol as us ready to start applying the velcro.
We only need a relatively small amount of Velcro to connect the panels to the camper roof. We apply the velcro to the panels’ outer edges while leaving room for any offset for the aluminum rail. We make sure there aren’t any bubbles limiting the velcro and camper surface connection by using a roller to apply even pressure to the velcro. With the velcro strips carefully applied, we set them aside and move onto the final step before installing the panels.
Solar Panel Wiring
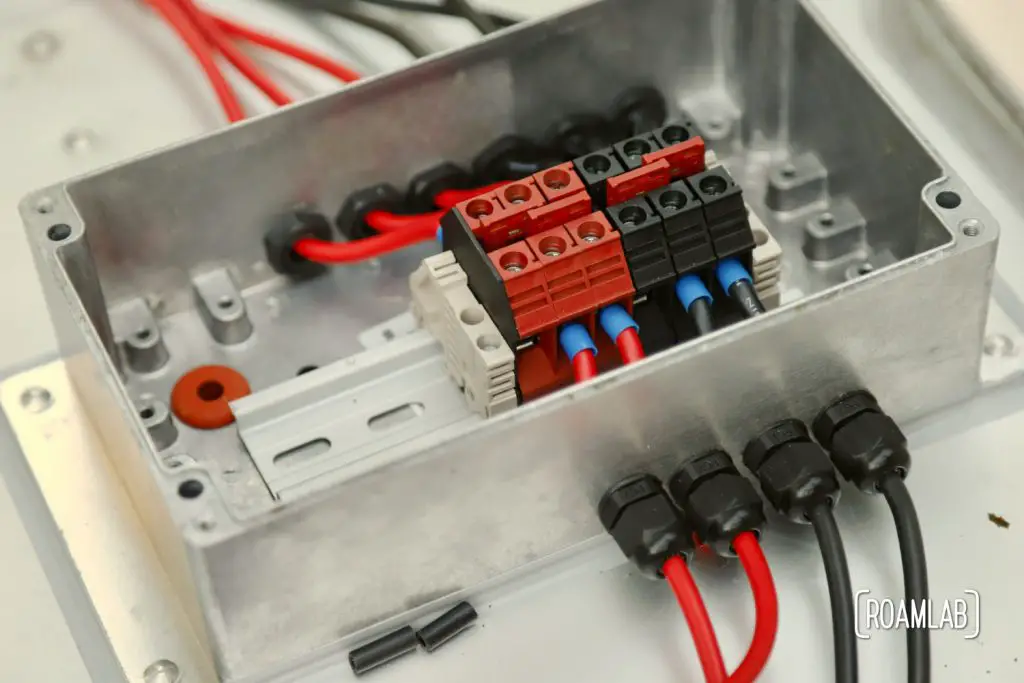
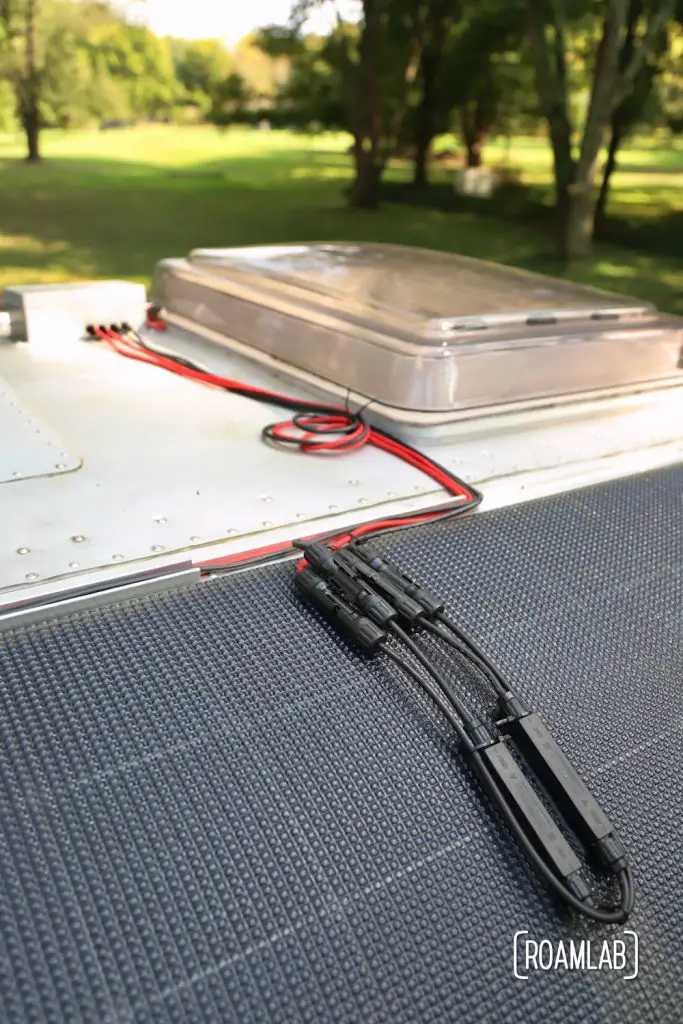
With all of this, it is easy to forget about the wiring of the solar panels. We avoid drilling holes in our camper as much as possible. So, we are routing all the wires through a junction box mounted on the camper roof. In the junction box, we connect all the wires to one 10AWG negative and one positive wire before traveling through the camper roof. This will minimize the potential for leaks into the camper. Once inside, the wires hook up the rest of the electrical system via the solar controller.
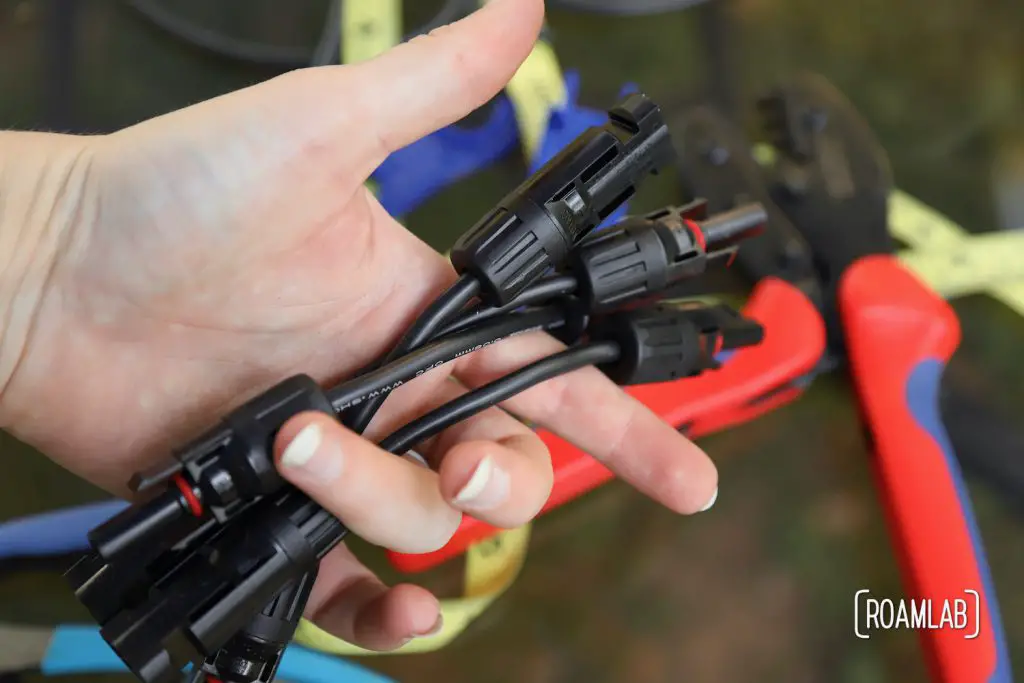
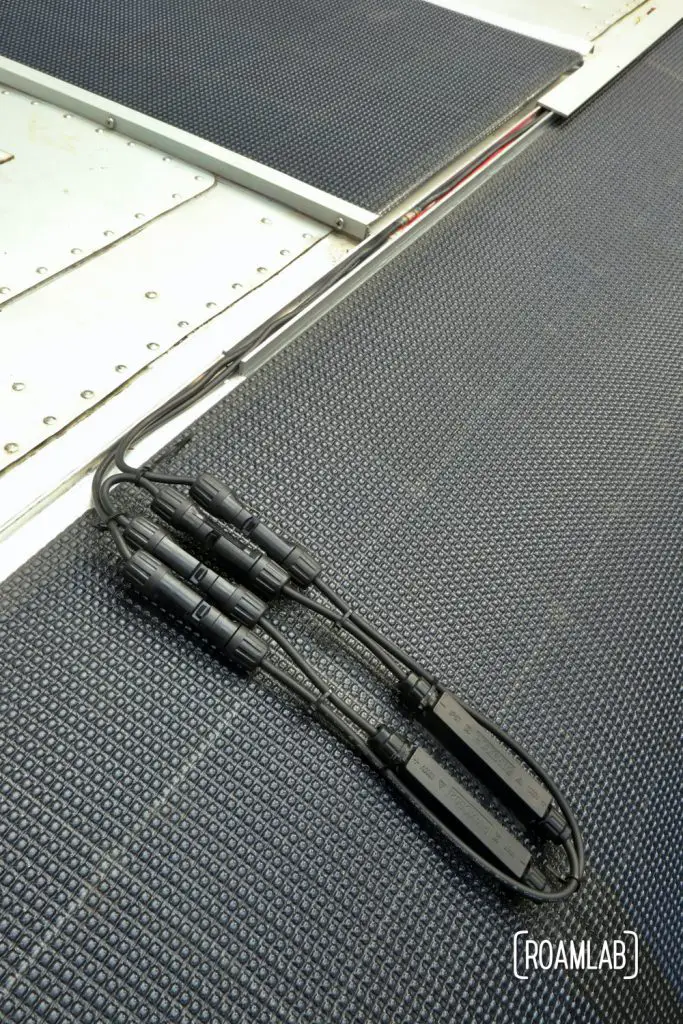
MC4 Connectors
We use many MC4 connectors so that each solar panel is easy to disconnect from the system. These are industry standard for outdoor solar connections. We connect each panel independently to the system with MC4 connectors to easily disconnect and reconnect the panel when necessary.
Protecting The Wires
All this means that many wires have yards to travel across the camper roof before reaching the junction box. These can be opportunities for branches and other overhead obstacles to rub against the camper roof and snag a cable, damaging the system. So we want to protect these wires as much as possible. Fortunately, we can integrate a lot of this protection with the aluminum frame. Along with snuggly holding the solar panels in place, the removable section also covers a channel for the cables. The wires connect to the solar panels, travel up through the covered aluminum rails, and then make the short hop from the rail to the junction box, relatively protected in the shadow of the roof hatch. (We are still settling on long term solutions for this final stretch of wire.
Installing the Solar Panels
With the velcro attached, aluminum rails riveted, and wires ready for connecting. It is key to have the panels in place before they engage with the velcro. So, we lightly tape a plastic sheet to the solar panel’s back to cover the velcro hooks. Once the panel is in place, we can gently pull out the plastic sheet and push down the panel to engage with the velcro firmly. Once it’s all together, we’ll have to carefully pull up the entire panel if we want to move it.
Next, we connect all the wires to the solar panels. We like to monitor the solar controller app to see increased wattage as each panel is connected. We have a few strategic points where we use zip ties to secure the wires and rout them into and out of the aluminum frame and junction box.

Now, we can screw the aluminum frame together to secure the panels and wires. We have to be very careful not to strip these threads as the bolts are stainless steel, but the frame is a much softer aluminum. So far, it is holding up well!
More to Come
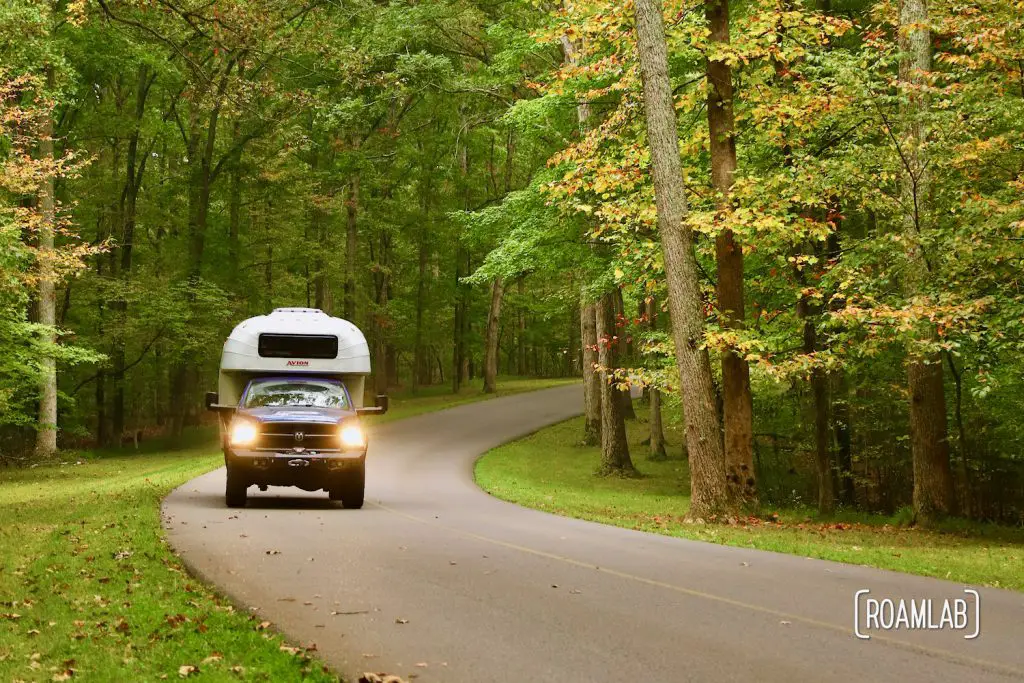
With the panels installed, we are ready for a test drive. As much as we feel confident that we have dotted our “i”s and crossed our “t”s, it’s a hair raised experience. We stick to surface roads for this first trip, gradually working our way on to faster thoroughfares, maxing out at 55mph. When we are done, everything looks to still be in its place.
While we are pleased with the setup’s roadworthiness, we still have upcoming solar panels projects. With fall in full throttle, we aren’t worried about overheating the panels in the near future. Instead, we will be switching gears to some more weatherproofing and insulation work. But we do have upcoming plans to add more than just an air gap between the solar panels and the camper roof.


Hi, just read your post and love it. I have been trying to find someone that has had success with this. I am looking to connect a flexible solar panel to a Thule roof box so it’s available for off grid camping. What panels did you use and would you still suggest using Velcro with a wind break in a roofbox application?
Hi Brian!
That sounds like a neat idea. My main hesitations would revolve around the flexibility of your panel, the durability of your mounting surface, as well as general wear and tear. All flexible solar panels are rated for a certain degree of flex. So you will need to make sure that the surface to which you are mounting it doesn’t require too sharp of a curve. The curve of our roof isn’t terribly sharp but even that was pushing the specs of our panels. Along those same lines, I’m not sure what roof box you are considering, but you’ll want to make sure that the curve for the panel is on only one axis. A lot of roof boxes I see have a slightly domed shape that wouldn’t translate well to mounting solar panels.
Also, you probably should reach out to Thule about the durability of their roof box. We are riveting aluminum to aluminum, something we already have a lot of experience doing. And even then, we invested time into researching what rivets would be strong enough to support the rails that hold in the panels’ edges.
I guess that brings me to wear and tear. I assume that this roof box is going to result in the solar panel being one of the highest items mounted to your vehicle’s roof. That’s great for sun exposure but dangerous in terms of tree branches and other low-hanging obstacles that might damage your panel. All vehicle roof solar panels need some degree of durability, but tree branches can be surprisingly capable of tearing at plastic edges or catching cables. You may need some extra precautions to protect your panel and the cables that will connect them to a battery source.
If you choose to move ahead, I’d love to hear how it works out!