Custom Truck Bed Design Creating Storage For An Overland Truck Camper
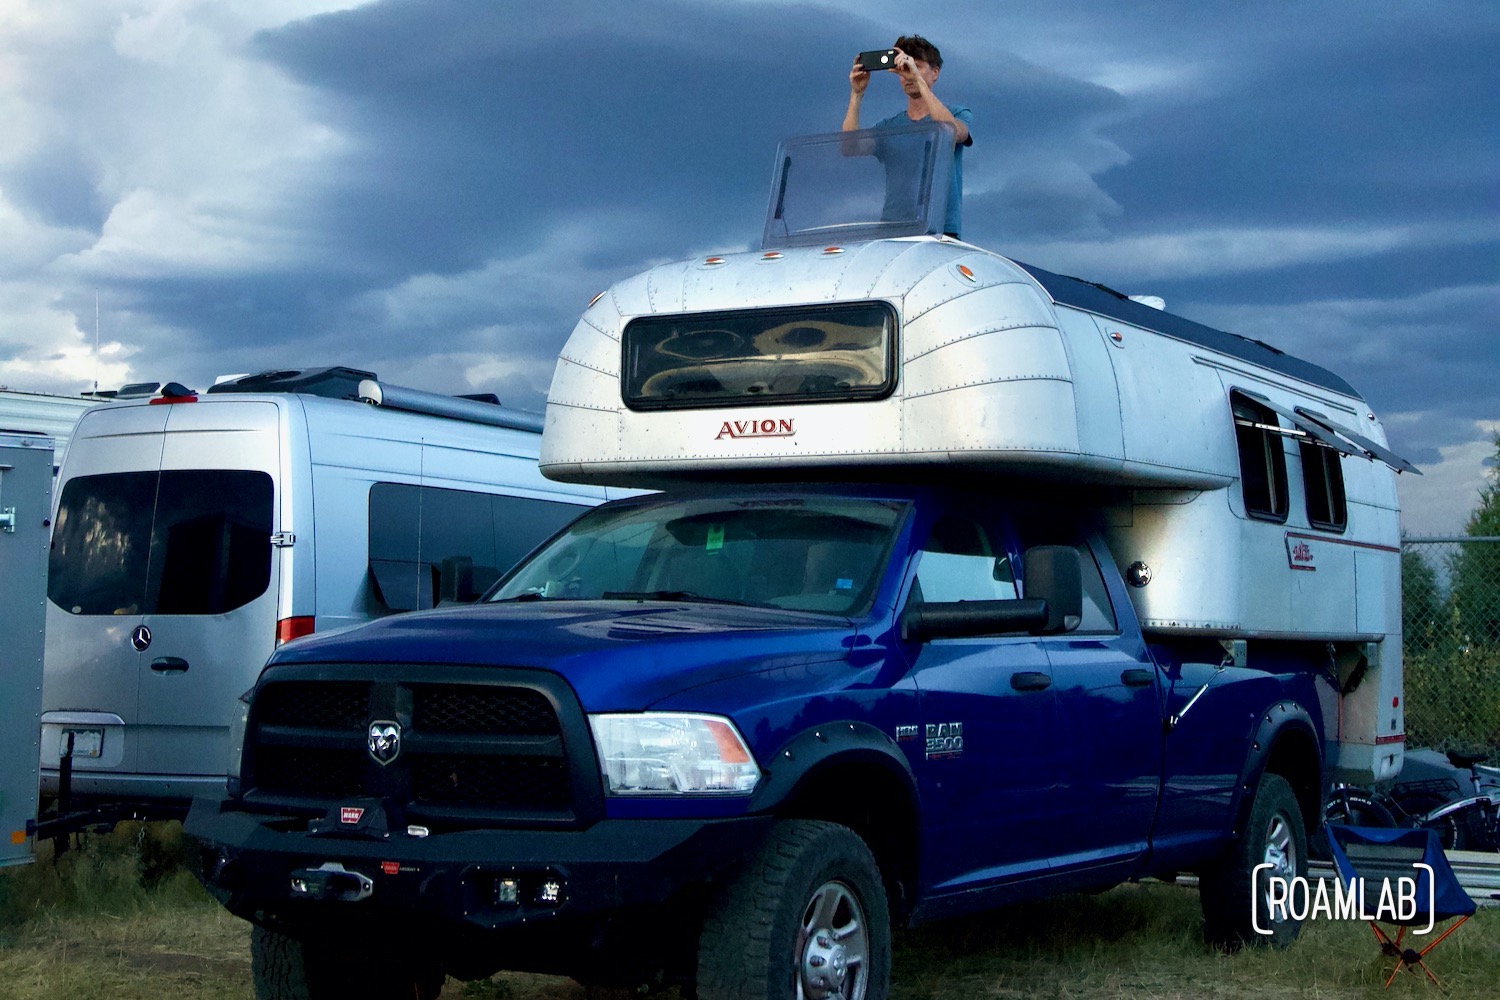
We love truck campers. Their size, flexibility, and convenience had us sold long before we found our 1970 Avion C11 slide-in truck camper. But there is one very notable downside: storage. Sure, we already knew our camper would be on the small side. But, there’s a lot of potential storage lost where the camper body cuts in to make room for the truck bed’s wheel wells and walls. That actually adds up quite a bit of unused empty space (how much, we’ll get into later). But that space could be usable with the right truck bed design.

So, we are finally doing something we’ve been talking about for years: commissioning a custom truck bed. “Commissioning?!” You may well ask. “Why, isn’t our raison d’etre to do it ourselves?” Certainly! But, as much as we are eager to learn new skills, we recognize our limitations and the cost of tools to overcome them.
We learned to weld a few years ago, but only enough to recognize the extreme time and effort it takes to master this skill. So, we are deferring to professionals to build our truck bed and collaborating on the design.
Measuring Everything
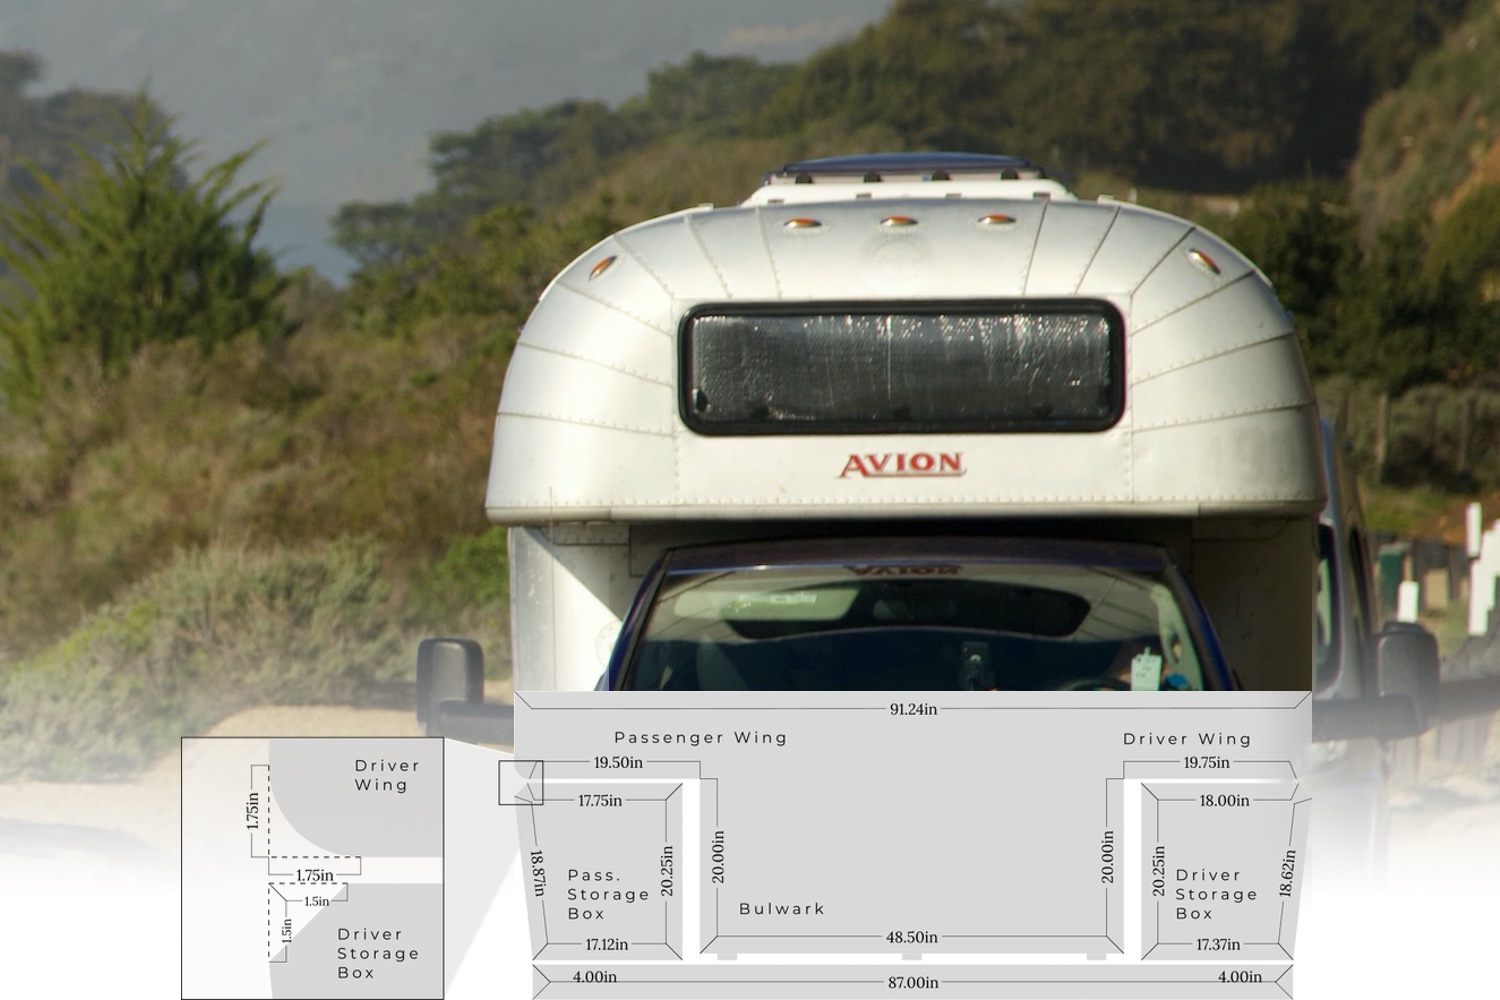
To start, we need to establish the dimensions of the camper that the new truck bed will support. Of course, precision is a challenge when working with the rounded corners of our Avion. That said, we aren’t planning to perfectly mirror the curves of the camper. And, what matters most is the boxy underside that is usually concealed behind the walls of the truck bed: namely, the camper floor, lower rear wall, side wall, and wing as detailed below.

In measuring the camper, we confirm one unfortunate fact: the camper isn’t perfectly symmetrical. The variations between each side are small but significant in terms of this build. This is, after all, a structure constructed in 1970 that has been knocked around by over half a century of bumpy roads and bad weather. And, despite my best efforts when rebuilding the base, there are some inconsistencies that quickly became apparent.
| Height / Depth | Width / Length | Width / Length (alt)* | |
|---|---|---|---|
| Floor | 48½” | 100⅛” | 99¾” |
| Driver Wing | 21½” | 100⅛” | – |
| Passenger Wing | 21¼” | 99¾” | – |
| Driver Side Wall | 20″** | 100⅛” | – |
| Passenger Side Wall | 20″** | 99¾” | – |
| Driver Rear Wall | 20″ | 21½” | 19½” |
| Passenger Rear Wall | 20″ | 21¼” | 19¼” |
*Alt measurements are only relevant in cases of inconsistent measurements such as the rear walls which are cut at an angle.
** Measurement reflects the height of the physical wall. Not the distance from the truck bed floor. The truck camper sits on a set of three rails that lift the camper an additional ½” to ⅞”. Yeah, that was a little inconsistent since it was one of our first projects when renovating the camper and attaching the floor to the side walls was an awkward affair.

Truck Bed Dimensions
Before we can start building, we need to settle on the dimensions of the truck bed. Some are out of our hands, such as practical requirements to fit on our 2015 Ram 3500, accommodating the wheels and tires, and remaining road legal. But along with that, we have a lot of options. Some dimensions are dictated by practicality. We want a lot of storage, after all. But some of it also comes down to aesthetics. It would be a shame to have a clunky truck bed after all the work we’ve done on such a stylish camper.
Bed Length
The Avion truck camper establishes a hard cutoff on the length of the truck bed due to the fiberglass basement that hangs below the camper’s floor and stores a couple of tanks. Obviously, the truck bed can not travel beyond that point, which gives us a working length of 99¾-inches from the bulwark of the camper to the beginning of the subfloor. (We’ll slice off a half inch for wiggle room.) Add to this a few inches of transitional space from the truck bed to the cab. In total, this makes for a truck bed length of 103¼”.
Bed Width
The bed width is an interesting challenge. We have two guiding widths: the width of the truck cab and the width of the camper. The truck cab is about 77-inches wide. Meanwhile, the truck camper flares out to a maximum of 87 inches wide. It seems like a waste of space not to take full advantage of this additional width. After all, that translated into 10 extra inches of storage. But it may look odd for the bed not to match the width of the cab.
Deck Height
Our goal in the design of this truck bed is to keep the camper at the same height relative to the truck cab. An elevated truck bed translates into a raised camper and center of gravity. That would also lead to a notable gap between the truck cab and camper cabover.
As such, this bed is not meant to have the wide, raised look of most flatbeds. We want it to sit as low as possible on the truck without sacrificing its structural integrity. At the moment, it looks like that means the bed will be 4-inches thick.
| Max Width | Min Width | Length | Depth | |
|---|---|---|---|---|
| Truck Bed Deck | 103¼” | 77″ | 87″ | 4″ |

A Twist
When I started writing this post, it was in the middle of our design process. I used it as an evolving reference for ourselves and the truck bed manufacturer: Brent Bowen, and his company Bowen Customs. A lot of things changed between when we first started talking and when the design was finalized. What we thought we wanted, gave way to a shared vision informed by our needs and Brent’s expertise.
So what do I do with the rejects? I could just delete them from the internet. I’m sure some Wayback Machine may have parts cataloged. But why share our abandoned ideas? Well, there are two answers. One: I think it’s an interesting point of reference to compare what we thought we wanted. And two: I spent a lot of time making these diagrams and I’m not ready to throw them away yet.
So, here’s the deal: this is a write-up about designing a truck bed and the failed ideas are part of that process. But you may not be as interested in the rejects as I am. So, I will highlight the draft section below. If you are curious, read on. If not, you can scroll down to where we detail our final design or click here.
Fall 2021 Design Concept
Truck Bed Storage Box Design
With the basics of the truck bed settled, we finally move into the creative process. How do we get the most storage out of the truck bed while ensuring that we can securely mount and dismount the truck camper? The most difficult challenge is designing the upper boxes. Here, we walk the tightrope between maximizing storage while allowing us to handle the camper. The process of reaching the ideal solution takes us down many routes. Our design: removable upper boxes so that they will be out of the way while mounting and unmounting the camper.
Box Width
In an ideal world, we would create boxes that perfectly fit the camper and used every inch of space. But, anyone who has mounted a truck camper knows how difficult it is to fit the camper body between the truck bed’s wheel wells. We need some wiggle room to mount the truck bed under the camper. Currently, we have four inches of wiggle room between the wheel wells and camper body and that’s worked well enough that we’ll reproduce that spacing between the new box. So, our camper floor is 48½-inches wide, plus 4 inches, for a 52½” distance between the boxes.
With that in mind, we can settle on the width of the boxes. A cross-section of these boxes will roughly mirror the rear walls of the camper while taking into account the extra wiggle room of 2-inches on each side for the camper. This means that the greatest width of the boxes will be 19½” on the driver side and 19¼” on the passenger side while the boxes taper to 17⅜” on the driver side and 17⅛” on the passenger side.

Box Height
Returning to our ideal world, the upper storage box height here would mirror the distance from the truck bed floor to the camper wing. On the driver side, that would be 20½” (19¾” sidewall + ¾” rail) and on the passenger side, it would be 2¾” (20″ sidewall + ¾” rail). But we need some wiggle room.
| Max Width | Min Width | Height | Length | |
|---|---|---|---|---|
| Driver Storage Box | 19½” | 17⅜” | 20¼” | TBD |
| Passenger Storage Box | 19¼” | 17⅛” | 20¼” | TBD |
At this point, we were narrowing in on a design where the boxes are formed using the camper wing to act as the top and inner side of the box, the bed deck as the base, and then three removable walls to enclose the truck bed with the long outer side acting as a fold outdoor as laid out below.

How the Truck Bed Design Changed
The design becomes increasingly complicated as we struggle to finalize a layout that is sturdy and easy to assemble. This is when Brent comes back to us with a curveball: what if we are so tied to our idea of a flatbed that we are missing out on a far more simple and efficient design? What about modeling this bed after a classic utility bed but with truck camper sensibilities?
Here instead, of removable boxes from a flatbed deck, the boxes are built into the bed. The greatest upside in this design shift, in our opinion, is that it allows us to reclaim the 4″ thick dividing space that had been allotted to the truck bed’s deck that the boxes would sit on. 4-inches may not seem like much until you multiply that by the width and depth of the boxes, but it allows us to reclaim almost 6 square feet of storage space. Aside from that, this design is far, far more simple. And in a world where each moving part is a potential failure point, simple is desirable.
Additional Truck Bed Features
Settling on the concept doesn’t change many other core needs. Along with the storage boxes, the truck bed also has to accommodate a few other considerations.
- The gas intake for the truck is built into our current stock bed and will have to be replaced for this new, custom bed. We need to keep the location of that intake elevated to ensure that gravity can pull the gas into the truck’s gas tanks.
- We charge our batteries with the truck alternator. Along with the solar panels, it is a key power source for topping up the batteries in our camper while on the road. For this, we hook up the camper using a plug installed into the truck bed. We will have to replace this connector in the new bed.
Both of these features have, in our original setup, been located in the forward driver side truck bed wall. We’ll keep both in similar positions.
Camper Modifications
Now that we have the truck bed design set, there are some alterations we will have to do to the camper to accommodate the new bed.
Jack Points
Our jack points have been a constant challenge in designing the new truck bed. These angle brackets are critical for loading and unloading the camper but they get in the way of our proposed boxes. We could make space for the jacks where they hang over the upper boxes. But that’s potentially messy and limits the utility of the boxes. Instead, we’ll be installing new, removable jack points so that they will be out of the way when they aren’t in use.


Tie Downs
We currently use tie-down points on the truck bed to hold our truck camper in place. Originally, we used Brophy tie-downs, which attached to the top lip of the truck bed walls. A few years later, we upgraded to the Happijac Tie-down System, an anchor that has served us well for the last couple of years. But with the truck bed gone, so goes all our past forms of tie-downs.
With the loss of one anchor, we gain a new (superior) one. Instead of external mounts that have, in the past, been snagged by brush on the trail, we will have internal tie-downs, accessible inside the truck bed boxes. But that means we also need to shift the tie-down point on the camper.
Originally, the tie-down points were on the outer edges of the wings, now we will need to install tie-down points on the inner edges of the wings. Fortunately, we’ll be killing two birds with one stone with the design of the new removable jack points which will also stretch into the inner wing and drop down as a tie-down.


Finalizing the Truck Bed Design
The process of designing a truck bed certainly has not been straightforward. We were confident in our vision from the very beginning. We spent years brainstorming our wants and needs. And in bringing in a fresh mind by contracting with Brent, so many of our preconceived designs were abandoned. Our thinking had been limited by the tools we understood. But, in working with Brent, we abstractly gained access to welders, heavy-duty metal breaks, and an industrial CNC.
Now, it’s left to Brent and his team to bring this vision together.
Are you curious how it comes together? We were too. But in February 2022, we drive out to Denver, Colorado to install the new bed and document the process.